Monday, March 7, 2011

Out to Eat with a pocket sized sketchbook

Yesterday we went out to eat at Mozza Mia, a wood grilled pizza place in Edina, with my mother and father -in-law. My husband and I got there earlier than they did and I had a tiny (3.5x5) pocket sketchbook and pen with me and sketched while we talked and waited.
The food was great and they have an open wood fired kitchen, so you can see the chefs working and the fire in the big open ovens.
I had never done that before, sketched in a restaurant, and I think it was a nice way to pass the time and notice as well as remember someplace new.
Neither sketch took very long, 10 -15 minutes, with a pen.

Monday, February 28, 2011

Travel Paint Set Make-over

Yesterday I spent the afternoon puttering around in my studio; cleaning up, moving piles, and just generally doing nothing really spectacular or artistic but just wasting time. During this putter session I discovered a reasonably nice set of Grumbacher tube water color that I had forgotten I had.
Now lately I have been on a mission to paint more and get better paints, as I have been using a set of Marabu pan colors that I found at an estate sale. There was nothing wrong with the paint, although a couple colors were grainy, it's just sometimes I felt they might not be the greatest paints anymore because of their age. But I kept using them because the set was a nice size for in my bag.


Well I had a bit of an epiphany - I could use the set and round pans, but empty them of the old paint and fill them with the Grumbacher paint instead. I now had a new putter task, one that was useful and exciting. First I popped all the old pans out. When I did this I discovered they were labeled for color on the bottom, very handy, as I could now match them to my new paints.


I proceeded to pop out all the old paint, washed up the mixing tray, and filled the now empty pans with fresh paint.
In the process I discovered with a few less color choices, I had room inside the box for a new mini Niji brush I just got as well as a sharpie pen. So not only did I get new paint but I turned this into a totally portable paint set, everything included.
I am set now for the weather to warm up, so I can go out and paint.

Sunday, February 27, 2011

Transfering Images using Chartpak Marker

Here are the steps for the last type of transfer that I use in my classes, using a Chartpak marker (colorless blender pen). This type of transfer is quite simple, although it does smell a bit because of the marker (solvent based), and you do have to purchase a marker (only found at art supply stores) to make it work at all.

Supplies you need to gather:

Images to transfer - toner based copies or laser jet prints (inkjet prints WILL NOT work)
scissors, paper to transfer onto, Chartpak colorless blender pen, wooden spoon or bone folder.

Cut out the image you would like to transfer. This type of transfer reverses everything, so if you are using text or if your image needs to be in a certain direction create a mirror image prior to starting this process.
A note on color images - this process will transfer some colored ink, not all colors, not all the time. I recommend black and white images to my students but some have experimented with color images with mixed results.

Place the image face done in the desired location on the new page. Hold the image firmly in place with a finger (you do not want the image to shift during the transfer). Color over the top of the entire image using the marker. The paper will become translucent and you will see the image you are transferring.


After coloring over entire image, use the back of a wooden spoon or the flat of a bone folder to burnish firmly over the entire image. This step is most important and the easiest place for this type of transfer to go wrong.
While you are burnishing be sure the image stays in its original location and does not shift or the image will blur.

Peel up the paper to reveal the transferred image. At this point you can use the image to make an immediate second transfer that will be lighter or ghosted from the original transfer with no additional coloring with the marker, just choose a placement and burnish over the image a second time. At this point the ink on the image will be spent and it can go in the trash.

This type of transfer creates a grainy version of the image on the page, that seems like a photocopy was made directly into your work. You can draw and paint over the image and it will blend into the page. Transfers made with less burnishing will be lighter, transfers that are ghost images from transfers will be lighter still.


Monday, February 21, 2011

Transfering Images using Gel Medium

The next method I have used to transfer images is by using acrylic gel medium. This method takes awhile to complete because it has to dry for several hours (overnight) before you can fully complete the transfer process.

You will need to gather:
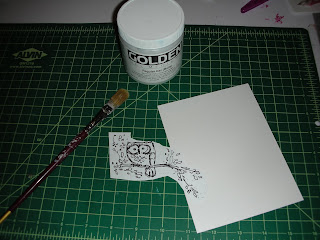
Images - toner based copies or laser jet prints - black and white or color (ink jet prints WILL NOT work)
Acrylic gel medium, a paintbrush, and a piece of paper or sketchbook to transfer onto that can take wet media

Carefully cut out the image, trimming off all the extra paper.
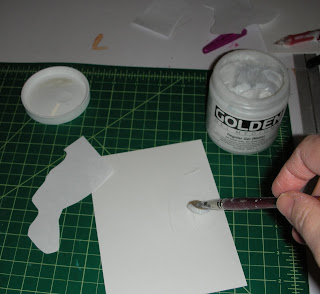


Decide where on the paper you will want the new image transferred.

Brush a solid layer of gel medium onto the paper where you want the transfer to go.
Work quickly, the gel needs to be still wet when you place your image into it.
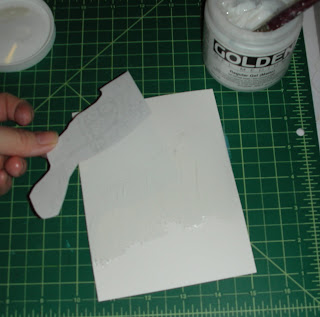


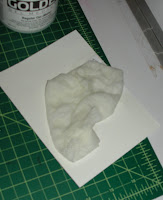
Place your image face down into the wet gel.

If you are using text it is important to remember that the image will be reversed when the process if finished, so manipulate (reverse) your image before transferring.

If you are transferring a large image, it is best to brush gel and stick picture down in sections or the gel will dry before the image can be stuck down completely.
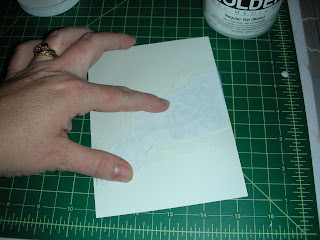


Smooth over the back of the image with your hand, pressing the picture into the gel, removing lumps, creases, and bubbles. Remove any extra gel that squeezes out from under the edge of the image.

Your image needs to sit in the gel until it has dried. Usually three hours works, but I often let them sit overnight.


The next day, you will need some paper towels, a sponge, or rag and clean water.
Wet the towel, making sure it is fairly wet.

Place the towel over the image, squishing the towel so water soaks into the paper backing. Allow wet towel to sit on the image for fifteen or twenty minutes.
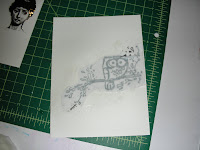


The paper backing will become sheer when the image has soaked under the towel long enough to begin removing the paper from the transferred image.
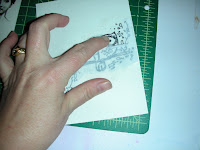


Keeping your finger damp, gently roll the paper backing off of the image. Be sure not to use an alternate tool or your fingernail as a scraper, use only your finger or you will remove the image with the paper.

You may find that the paper does not come off after the first time of soaking under the wet towel. Sometimes you cannot tell there is still paper on the image until after it has dried. Simply return the wet toweling to the image and repeat the paper peeling process until
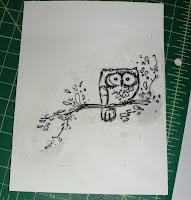
all of the paper has been removed.

You will be able to paint over and on top of the completed transfer with either watercolor or acrylic paint or you can use pencils or other media to alter the image as desired.
If you have a painted background, the background color will show through the image too. This process also works with colored acrylic paint applied as the gel, leaving a transfer on a colored background of paint.

As you can see in the piece of artwork I made last summer using this method to transfer a drawing I created onto multiple square pieces of paper that I had painted first with liquid acrylics.
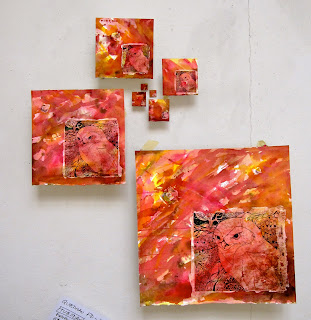

Imagine all the possibilities when you can create more than one copy of a drawing.
Happy transferring.

Transfering Images using Packing Tape

One of the cool new techniques I have learned in the last year has been to transfer images. I am sure there are many ways to transfer images, but I have had the most experience and success with three types of transfer: packing tape, gel medium and Chartpak marker.
I have passed that information on to my students and now I will be teaching you the same processes beginning with packing tape transfers.


To create a packing tape transfer you will need to
gather a few supplies:
Images - you will need toner based photocopies, laser jet prints, or magazine images in color or black and white (ink jet prints WILL NOT work!)
a scissors or craft knife, a container of water, transparent packing tape (clear or a color), a glue stick, and a sketchbook or other paper to transfer onto.

To begin, cut out your chosen image just like you would if you were going to glue the image into a collage.


Next, stick your image onto a piece of packing tape so the picture faces toward the sticky part of the tape.
If your image is too large for one width of tape, you can overlap multiple pieces to create a sheet of tape big enough to cover your image.
I like to trim some of the tape off my image now, so that the shape of the tape and the shape of my image are close (or you can trim later).


Now, place your images on the tape into a small container of clean water. They will need to sit in the water for about ten minutes.
You can create multiple transfers at once in the same container.
I have both a black and white and a colored image that I am using for this demonstration.


After your image has been soaking for ten minutes or so, pull it out of the water and put it on the table with the paper backing side up.
Then using your finger, carefully roll off the paper from the image and the tape.
Two things to remember: 1) keep your finger damp, dip it in the water often 2) do not use your nails or another tool, it will scratch off the image with the paper.


All of the paper will come off your image, creating a clear sheet of plastic tape with your image affixed to it.

If the paper does not want to come off all the way, return your transfer to the water and wait a few more minutes then rub off any remaining paper.


Now you can glue your completed transfer onto your paper. If you didn't trim off the extra tape earlier trim it now before gluing the transfer to your page.
Be sure to glue your transfer onto your page, it will seem like the tape is still sticky enough to hold the image in place, it is not and it will bubble up off the page in a couple of hours without glue.


This method of transfer can be a fun way to move text (nothing reverses) and images from magazines or photocopies of your artwork into your sketchbook or onto greeting cards or other work. Because the images end up transparent, you can paint or draw on your paper first and still see the color through the clear image you have transferred.
The only drawback to this type of transfer is that the image is glossy because of the tape, which makes it hard to draw or paint over the finished transfer.

Have fun! Go make a transfer.

Sunday, January 23, 2011

Portrait Party (from January) and a ranting confession (from today)

Monday night, January 21, 2011, the MCBA Visual Journal Collective with Roz Stendahl had its annual portrait party (you can see Roz's recap here).

My portrait partner was Briana; check out her blog through the link she has some great photos of the event including each of us with our portraits.


WOW - that was the beginning of my blog post from a month ago! A month, I cannot believe it. The really unfortunate thing is for that month, I have not created one single piece of art work. And I feel awful because of it.

I have let certain situations that I really have no control over, overwhelm me and drag me under the ocean of stress and worry and rather than work through it by re-centering myself in my sketchbook or a painting, I have shut myself down.
On the upside I recognize that I have been wallowing and I am finished with it.
I have also decided to start a series of posts that are tutorials or small "how-to" lessons, starting today (when I finish writing) with a lesson on using packing tape to create an image transfer.
So check out the links to the Portrait Party, it really was fabulous. And check back later this afternoon and there will be a fun new art technique for you to follow along with and try.

Tuesday, January 18, 2011

Lazy Monday Afternoon

The Sketchbook Challenge theme for the month of January is "Highly Prized". On Monday, we (my daughter and I) had a day at home. We hung out on the couch together watching silly movies, wrapped in blankets, with the dog at my feet and the cat on her lap.
A lazy afternoon together, what could be more highly prized?

Page pre-painted with liquid acrylics using bubble wrap and a hand carved stamp, drawing done with a Sharpie pen.